Migrate G Suite account to a Personal Google Account
The feature announcements of Google’s new Pixel 2 phones has me excited and ready to switch over to Android from iOS.
I have been using a G Suite account for many years - back when it was still called Google Apps For Your Domain - to allow me to use the excellent Google products behind my own email address instead of a gmail.com address.
Unfortunately, I learned that Google Assistant does not integrate deeply with G Suite accounts. This would mean I would miss out on many of the advantages the focus on Hardware + Software + Artificial Intelligence would bring from making the switch.
Not willing to accept a lesser experience, and holding a deep desire to try out the potentially truly smart mobile devices, I researched ways to migrate my G Suite account to a Personal Google Account and still keep the more professional vanity domain as my primary address.
Table of Contents
- Key Concepts
- Preparation
- Google Domains
- Chrome Bookmarks
- Contacts
- Calendar
- Photos
- Google Drive
- Gmail
- Sign in using primary email address
- Google OAuth - A Warning
Key Concepts
The guide is separated into a section per Google product.
There are two types of email addresses in use:
- A primary email address using your own domain
- A Personal Google Account email address ending in gmail.com (or googlemail.com)
There are two types of Google accounts in use:
- G Suite
- Personal Google Account
The G Suite account relates to the paid account using your own domain for login and email. For the purposes of this guide we’ll assume the primary email address is [email protected] and is initially associated with your G Suite account.
The Personal Google Account relates to what is also often referred to as a Gmail Account. It comes with access to calendar, drive, photos and many other Google products available to G Suite users. Personal Google Accounts have the extra benefits of a more integrated experience into Google Assistant. For the purposes of this guide we’ll assume the Personal Google Account is [email protected]
My G Suite account only had one User so this method is not tested against G Suite accounts with multiple Users.
Preparation
If you haven’t already done so register a Personal Google Account at https://accounts.google.com/SignUp.
Open two instances of Chrome with one logged into your G Suite account and the other into your new Google Account.
If you aren’t sure how to do this, click the text on the very top right of Chrome and select Manage People and select Add Person on the window that pops up to add separate users for G Suite and the Personal Google Account.
Google Domains
I transferred my primary domain to Google Domains some time ago and this turned out to be advantageous.
It’s worth noting that I am also using Google Domains nameservers which makes some of the setup easier - especially when we get to setting up email forwarding.
Initially the primary domain is owned only by the G Suite account and this ownership needs to be transferred to the Personal Google Account.
G Suite
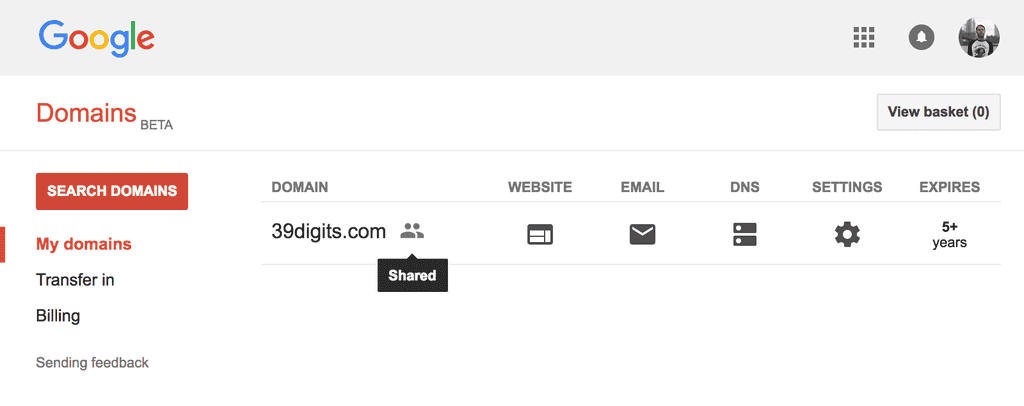 Open https://domains.google.com and click on the icon of two people to go to the Sharing settings. Alternatively, click on the gear icon next to your domain and then Permissions to expand the settings.
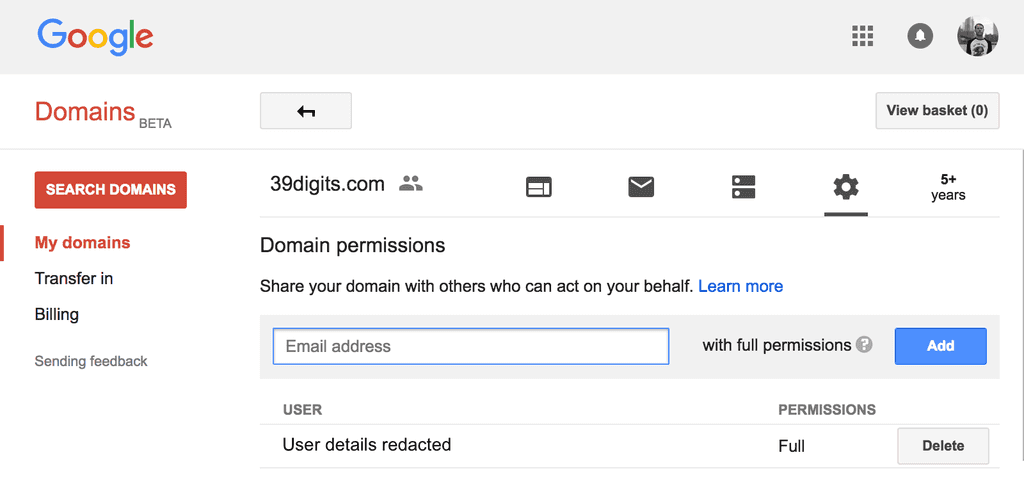 Enter the email address of your Personal Google Account and give it Full Permissions.
Personal Google Account
You should receive an email confirming at your Personal Google Account you have been granted domain management permissions for the domain.
Open https://domains.google.com and you should now see your primary domain listed in the My Domains section.
Feel free to remove the G Suite user’s permissions at this point.
Chrome Bookmarks
G Suite
Open the Bookmarks Manager (chrome://bookmarks/) and click Export Bookmarks to HTML file... in the Organize drop down.
Personal Google Account
Open the Bookmarks Manager (chrome://bookmarks/) and click Import Bookmarks from HTML file... in the Organize drop down.
Contacts
G Suite
Open https://contacts.google.com and click Export in the More drop down (not available in the newest look Google Contacts but you will be given the opportunity to switch to the old version if you click Export).
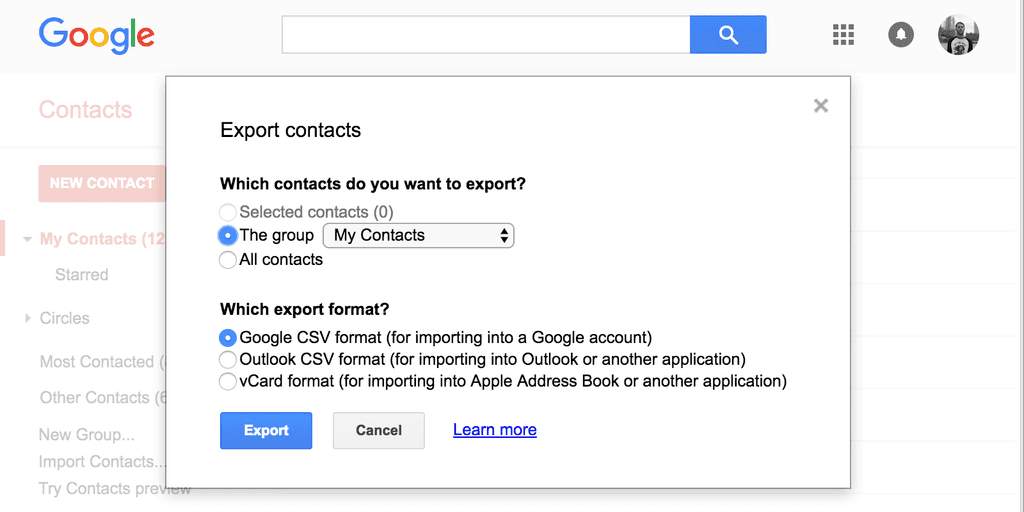 Customise the export to your preferences, but I used
- Contacts to Export. Export only the My Contacts Group to avoid also exporting Other Contacts which Google might add to if you have it set to store any email address to which you reply.
- Export Format. Google CSV is the preferred option.
Personal Google Account
Open https://contacts.google.com and expand the More drop down. Select the Import option and choose the CSV you created from your G Suite profile.
Calendar
G Suite
Open https://calendar.google.com in a new tab in Chrome.
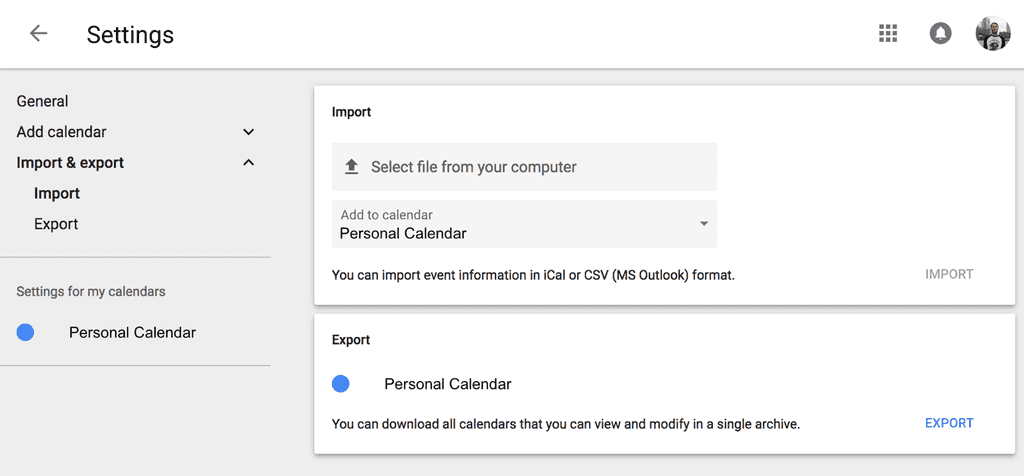 If you are using the newer Google Calendar layout, click on the gear icon in the top right and select Settings. Click on the Import & Export sidebar menu option and then click on the Export text in the bottom right of the Export panel.
This should download a ZIP file of your iCal events.
Personal Google Account
Open https://calendar.google.com in a new tab in Chrome.
Similar to the G Suite procedure, click the gear icon, choose Settings, click Import & Export from the sidebar menu.
Inside the Import panel, select the iCal ZIP file previously downloaded and confirm which calendar you wish to add the events. I only have one primary calendar so it would be chosen by default.
Caveats
Guests to calendar events in the G Suite account aren’t imported into the Personal Google Account calendar.
Later we will change it so you can also log into your Personal Google Account using the email address associated with your G Suite account. This will allow users to invite you to calendar events using your primary email ([email protected]) instead of the less professional Personal Google Account ([email protected]). Replies to invitations will, however, show as coming from your Personal Google Account.
Photos
I had been running the Google Photos iOS app for some time and all of my photos were being backed up to my G Suite account. Luckily all of my photos were stored on my phone as it had 128Gb.
To transfer photos all I had to do was log out of my G Suite account in the iOS app and log into my new Personal Google Account. The app will then begin syncing photos automatically.
Once completed it can take a few days to properly crawl your images and the EXIF data.
If you don’t have all your photos on a mobile device you can still export and import photos using two alternatives.
Alternative 1
Open https://photos.google.com in the G Suite account and select the Photos section from the sidebar.
Hover over the first image and click in the little circle to change it to a tick. Now hold down shift and click on the last photo to select all. You can then download all photos to your local computer.
Open Google Photos in the Personal Google Account and upload the images en masse.
Alternative 2
Same procedure as above, select all your photos in the G Suite account. Share these with your Personal Google Account and from that account choose Add to library.
I haven’t tried either of these so I am unsure of any caveats - for example, what happens if you delete your G Suite account after sharing and adding photos to the Google Account library.
Google Drive
You cannot export your Google Drive documents in the Google Document format. Instead these would be converted to MS Office formats during an export. This isn’t ideal as we’ll be importing it into our Google Account and expect it to be GDoc format.
Thankfully there’s a procedure you can follow using the Backup and Sync (previously Google Drive Sync) app on your computer.
G Suite
If you don’t have the Backup and Sync app installed then do this first.
Log into it using your G Suite account and allow it to sync all of your files to your local machine. This will download all files into a specially designated Google Drive folder.
Share all of your Google Documents (docs, sheets, etc) with your new Personal Google Account. You can speed this up by sharing on the folder level which will propagate to all subfolders and files. You don’t have to do this for normal files such as images, compressed archives, pdfs, etc and is only required for Google Documents due to owner permissions.
Using our examples, [email protected] would share all of their Google Drive files with [email protected].
Personal Google Account
Once all of your Google Drive contents has synced down to your laptop you’re ready for the next step.
Log out of your G Suite account in the Preferences section of the Backup and Sync app. The Google Drive folder will still be on your local computer with all of your files including those in Google Documents formats.
Now log into your Personal Google Account in the Backup and Sync app. It will find the Google Drive folder and begin uploading all files to your new Google Account Drive.
If you didn’t share the Documents with your new user it will fail permissions and only upload files that are not Google Documents. This ensures only Google Documents that you have permission to view and edit are added to your account.
Once completed your new Personal Google Account will be the owner of all files (previously owned by your G Suite user) inside your Personal Google Drive.
It is now safe to remove the shares from inside the G Suite account.
Caveats
Similar to Calendar Events these newly uploaded Google Documents will no longer have any of the previous shares. You will need to share folders and/or files manually once the uploads are complete.
You may also need to Add to Drive any files or folders that are under your Shared With Me section.
Thankfully this wasn’t an issue for me but you should be aware of this impact on your files.
Gmail
Configuring mail was definitely the trickiest of the switchovers with quite a few steps.
The key here is that I’ve transferred my domain to Google Domains which allows me to setup email forwarding quite easily. If you’re hosting elsewhere you could probably setup an email redirect but I haven’t tested out the workflow.
Step 1) Import emails into Personal Google Account
G Suite
Log into https://mail.google.com and go to Settings (found under the gear drop down menu) and then navigate to the Forwarding and POP/IMAP tab.
Enable POP Download on your G Suite account if it is not already turned on.
 Be sure the setting for When messages are accessed with POP is set to
 keep mail’s copy in the Inbox to avoid the messages being deleted from the G Suite account. This will be a life saver should anything go wrong.
Personal Google Account
Log into https://mail.google.com and go to the Accounts and Import tab in Settings.
Click on Add a mail account in the Check mail from other accounts option. This will trigger a popup where you’ll enter your G Suite credentials.
If asked to use Gmailify or Import emails from my other account (POP3) select using POP and continue.
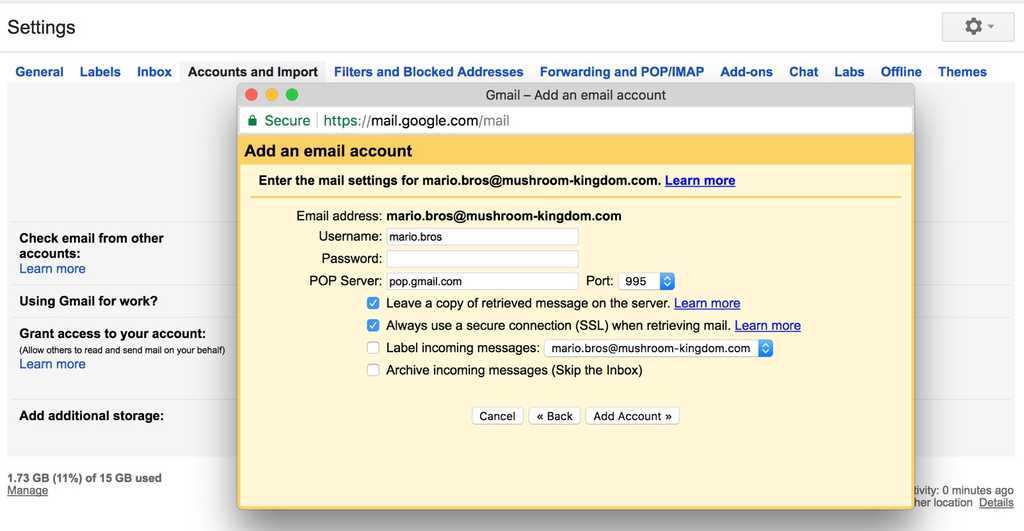
Email will be your G Suite email address. POP Server will be set to pop.gmail.com using Port 995 with the username and password to match your usual login.
You have the option of labelling the incoming messages and to automatically Archive the emails (I didn’t do either).
Ensure you have checked the Always use a secure connection (SSL) when retrieving mail. selection.
After you’ve filled in all the details and click Add Account you will be presented with the option to also send mail as this address. Choose No for now as we’ll set this up later.
Click Finish and go do something for an hour or three (maybe finish off those last few Shrines in Zelda - Breath of the Wild you've been putting off for ages?).
Click on the View History link now appearing in the Accounts tab to check progress. Wait until the feedback shows No mails fetched with regularity.
Once the import into your Personal Google Account has completed, send an email to your primary email address. This will allow us to test and verify emails sent to your current primary email address ([email protected]) will continue to be pulled in by your new Personal Google Account ([email protected]).
Step 2) Email Forwarding
At this stage, any email sent to your preferred email address ([email protected]) is still connected with your G Suite account. These emails arrive into your G Suite mail first and your Personal Google Account ([email protected]) simply pulls new emails received since the last import.
That’s not ideal as we want to move completely away from the G Suite account. It’s now time to setup email forwarding under our domain in Google Domains.
Personal Google Account
Open https://domains.google.com and click on the Email section next to the primary domain.
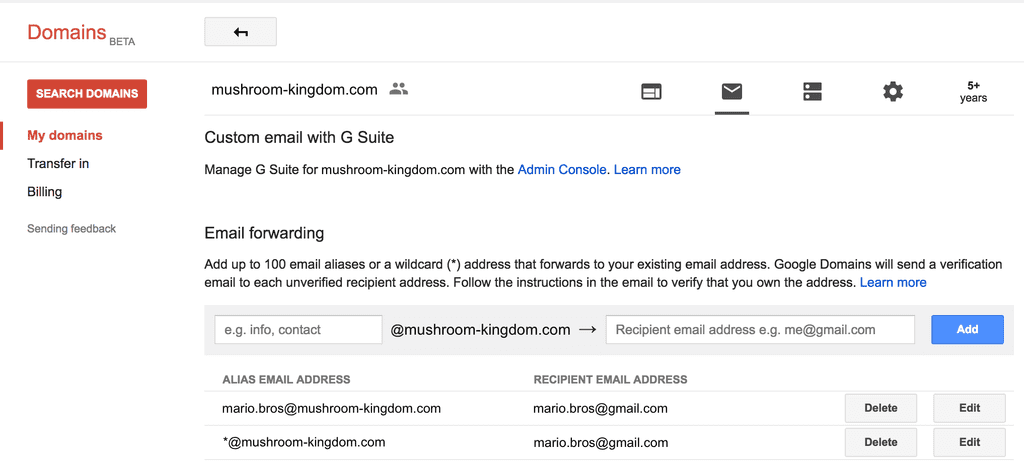
Under the Email Forwarding section add any desired email addresses under your domain that you wish to forward to your Personal Google Account. You can, if you wish, add a wildcard (*) address to forward any emails sent to your primary domain to your Personal Google Account.
Using our examples we would set [email protected] to be an alias email address forwarding to [email protected].
As an aside, once you set an email forward inside Google Domains it automatically adds Email Forward entries to the Synthetic Records section under the DNS configuration.
Test that the email forwarding is working by sending an email to your primary email address ([email protected]). You should now receive this email only in your Personal Google Account inbox ([email protected]) and it shouldn’t even touch the inbox of your G Suite account. Verify this by checking both inboxes at https://mail.google.com.
Step 3) Remove Import into Personal Google Account
Now that we have email forwarding setup and no emails hit the G Suite inbox it’s time to remove the import settings from the Personal Google Account.
Personal Google Account
Open https://mail.google.com if you don’t already have it open and navigate to the Accounts and Import tab under Settings.
In Check email from other accounts you will have the POP settings from the initial mail import still active. Click the delete link to remove this as it is no longer required. This will delete the link between accounts only and all emails in the original G Suite inbox are untouched.
Step 4) Send mail as primary email address
Currently if you were to reply to any emails received to your primary email address ([email protected]) it would come from your Personal Google Account ([email protected]). This is clearly far from an ideal solution.
Thankfully we are able to add multiple email addresses from which we can reply inside our Personal Google Account mail.
Personal Google Account
Open https://mail.google.com if you don’t still have it open from the previous step and navigate to the Accounts and Import tab under Settings.
Click on Add another email address under Send Mail As and a popup window will appear.
Enter the email address you wish to also reply from under the Personal Google Account. Using our examples we would enter [email protected] here. Keep the Treat As An Alias box ticked.
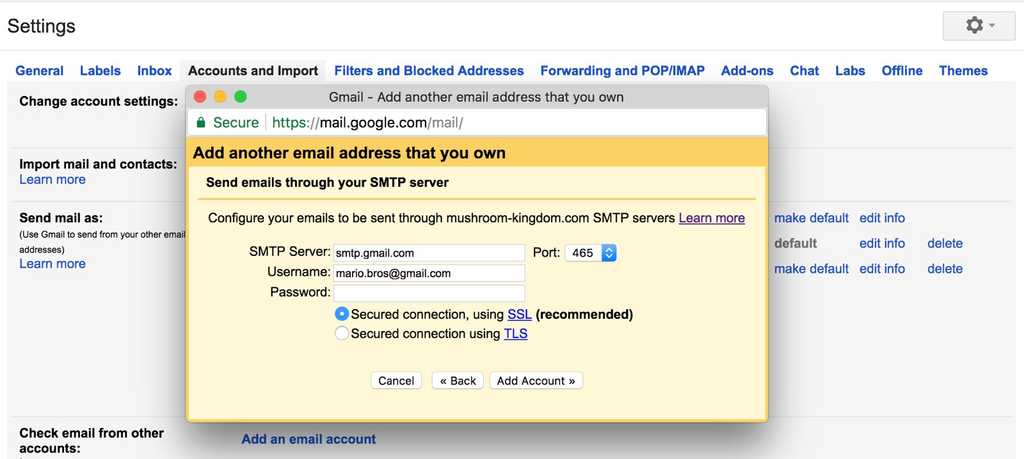 The next screen will ask you to enter the SMTP details. Enter
 smtp.gmail.com for the SMTP Server and your Personal Google Account credentials for Username and Password. Be sure to use SSL connection on Port 465.
The screen might also ask if you want to Send through Gmail or your own SMTP server as two checkboxes. If shown this simpler screen instead simply select to use Gmail.
After adding your primary email address ([email protected]) click on make default to ensure this is the default address.
You should now find you can reply to any received emails within your Personal Google Account as if it were from your preferred primary email address (and not the gmail.com one).
Sign in using primary email address
Emails to the primary email address are now being forwarded to the Personal Google Account, but it is still associated with the G Suite account as the login username.
The final piece to our migration is to add our primary email address as an alternative email on the Personal Google Account.
Unfortunately we cannot add an alternative email address that is already associated with a Google account. It is now time to completely disconnect the primary email address from G Suite and allow us to log into the Personal Google Account using that as the username.
G Suite
Open G Suite Admin at https://admin.google.com and navigate to Users.
Click to view the details of your User and expand the Account section. Click Edit under Basic Information and you should be presented with a popup allowing you to change the User’s email address. Change this email address to something unique and click Update User - this is so we can release our preferred primary email address from being used.
Using our example we could change [email protected] to [email protected] thereby freeing up our original address.
Note that the original email address becomes an alias against the user account. It is safe to delete this alias.
Personal Google Account
Open https://myaccount.google.com/email and click to add a new address under Alternative Emails.
Enter your primary email address ([email protected]) which will add it to our Personal Google Account pending verification.
An email will be sent to our primary email address which should be forwarding seamlessly to your Personal Google Account’s inbox. Open your inbox at https://mail.google.com and verify adding the primary email address as an alternative email to your gmail account.
Once verified you are now able to sign into your Personal Google Account using the more professional address associated with your own domain. Test this in an incognito tab to make sure everything is working.
Google Calendar
It's worth noting that adding an alternative email to your Personal Google Account will add it to the Allow responding to invitations forwarded through alternative email addresses list inside your Google Calendar settings for your primary calendar. This can be verified by looking at the General Notification settings for your calendar.
The added benefit to adding the alternative email means you can also be invited to calendar events using your primary email address.
What cannot be migrated?
Unfortunately not everything can be migrated from G Suite to the Personal Google Account.
Potentially the biggest hurdle for some would be purchases made through Google Play - be it music, movies or apps. Thankfully I had been using iOS up until the pre-order of the Pixel 2 XL so I did not have a huge investment in the Android and Google marketplace.
I could not find a way to migrate YouTube subscriptions nor did I spend much time researching Google+ migration options.
Google OAuth - A Warning
If you have created any accounts on external services using your G Suite account as your sign-in then you might have more work ahead of you. This is usually for services where you get the option to create an account or Sign In With Google.
You will potentially lose access to the third-party account if it does not also provide an alternate login method or a way to create an dedicated account after logging in with Google OAuth. Feedly, for example, allows you to associate your account with multiple Google Accounts making the migration from G Suite to my Personal Google Account a non-issue.
Sadly, I lost my Pokemon Go account due to this migration due to their inability to transfer accounts
Personally, I had not used my G Suite account to create single sign-on accounts with too many other services. Your mileage may vary so do tread cautiously.
You can take a look at the third-party apps with access to your G Suite account by looking in the Security tab under the User in the G Suite Admin. You Google Account Permissions page may also provide the list of authorised third-party applications.
BONUS: Using CloudFlare to manage DNS
If you wish to use CloudFlare instead of Google for managing your DNS then there is a solution. You will still need to have your domain registered at Google Domains for the email forwarding to work this way.
Point your domain to CloudFlare's DNS and be sure to add the following as MX Records:
- gmr-smtp-in.l.google.com (Priority 5)
- alt1.gmr-smtp-in.l.google.com (Priority 10)
- alt2.gmr-smtp-in.l.google.com (Priority 20)
- alt3.gmr-smtp-in.l.google.com (Priority 30)
- alt4.gmr-smtp-in.l.google.com (Priority 40)
Test the emails are forwarding by emailing your primary email address ([email protected]).
THE END!
